January 11, 2016
In
Uncategorized
Ink Layering: Further Explorations
I should name this post “the more I learn the more I need to learn”. If you remember, last week I was trying to jump in feet first and try to produce some artwork using layered oil-based lithography inks (Hanco) to create new tones. In that experiment, I realized that I’m just winging it when it comes to predicting, and then controlling, the results of multiple layers of ink.
Luckily, my best friend came to visit. He has a degree in printing and has worked in commercial print shops so he has hands-on experience with all of this stuff.
For the next little while, instead of trying to produce art, I’m just doing diagnostic experiments. I created a single block that can be rotated and printed four times to demonstrate all of the permutations of inks that those four layers are capable of producing. (I use the word permutation instead of combination because the layers are laid down in a specific order. There are way more combinations possible if I could change the ink orders.)


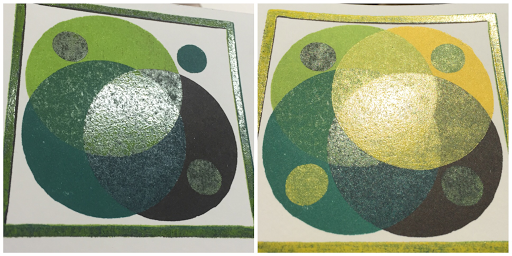
[Experiment 1: one hour on a radiator between layers]
The first thing to notice is how the layers blend together over time. Look how bright the teal over black looks in the first image compared to the second. Same with the lime over teal in the second and third images. Over time, something is happening to blend the colors. A) The inks are soaking into the paper. B) The lower inks are bleeding and darkening the lighter-colored wet ink on top. C) The top ink is becoming more transparent as it dries, revealing the darker inks below.
If it was A or B, letting the inks dry more thoroughly might help the situation. In the next experiment, bearing in mind that I’m trying to learn this stuff quickly, I baked the prints in a toaster oven at about 200 degrees for 15 minutes to cure the first 2 layers and 30 minutes once I saw the ink building up.

[Experiment 2: 15-30 minutes in a toaster oven between layers]
I noticed that the biggest difference in results happened in the spots where the last layer (yellow) was printed over the first layers (black and teal). Those layers had the most amount of baking, making them the driest. This tells me that I may be onto something – thoroughly drying ink layers before overprinting might lead to more predictable layering.
I also noticed that the yellow-over-black section did not cover as well as the sections with a higher ink load. I think this means that paper absorbency is a factor, too. After a paper has absorbed as much as it can, the inks start layering on each other. Until then, they seem to soak into the paper and blend together more in the process.
[Gloss from ink buildup]
Here are a couple shots that show how thick the ink is getting by the third and fourth layers. It’s not absorbing into the paper much at all by layer 3.
Carl had another idea that could improve the results of layering – more opaque ink. The inks I’m using are litho process inks, and therefore quite transparent. To get the coverage that I do, I’m inking pretty heavily. I need to learn more about the types of ink that exist and find some that are more opaque to get the type of results that I want and do it with thinner layers that would allow greater detail in my designs. And thinner layers would likely lead to more behavior like the yellow-over-black in the second example, which means less less coverage. So the mythical new ink would probably need to have a LOT more opacity in order to work the way that I want it to.
See? The more I learn, the more there is to learn.
If you know anything about sourcing or mixing oil-based inks with a higher opacity and getting better multi-layer blends, please leave a comment. I’ll give you lots of credit when I write up a whole blog post explaining what I did after I finally get it figured out. Thanks!
Sorry, the comment form is closed at this time.